

41 Chicano Drawing Ideas With Pencil References to Draw From
Chicano art came out of the Mexican-American barrios of the Southwest, and it carries that history in every mark — the fine-line grey work borrowed from prison tattoo culture, the catrinas from Día de los Muertos, the lowriders, the script, the family portraits. It is a style built almost entirely in soft graphite and black ink, which makes it unusually good practice: there is no colour to hide behind.
Below are 41 drawings pulled from that tradition. Each one names the specific technical problem it will hand you — a foreshortened arm, a hat brim bending in perspective, symmetrical filigree, an open screaming mouth — so you can pick by what you want to get better at rather than by what looks nice.
41 Chicano Drawing Ideas to Work Through
1. Sun Hat and a Rose Sleeve

Start here because the hat does half the work. The woven brim is a repeating chevron that curves with the crown, so the weave has to bend in perspective — draw the brim ellipse first, then run the pattern across it rather than stamping identical marks in a straight line. Under it, the rose sleeve reads as one soft grey mass from a distance and only breaks into petals up close. Squint at the reference: if the tattoos still read as a single tonal shape, your values are right.
2. Snapback Cap and Flowing Hair

The cap brim is a hard, flat plane sitting on top of the softest thing in the drawing. That contrast is the whole picture. Keep the brim edge crisp and almost unshaded, then let the hair go loose — long strokes that follow one direction, with the darkest values tucked underneath where the hair overlaps itself. Beginners usually shade every strand; instead pick three or four ribbons of hair to render fully and let the rest stay as suggestion.
3. Angel Wings, Flowers and a Skull

Three symbols stacked in one vertical composition: wings top, face centre, skull at the base. It works because each element gets a different texture — feathers as repeating soft edges, skin as smooth gradient, bone as hard-edged shapes with deep sockets. The tiny script tattoos across her cheekbones must follow the curve of the face, not sit flat, or the whole head goes cardboard-thin.
4. Cap, Shades and a Smoke-Wrapped Neck Piece

The sunglasses hide the eyes, so all the expression lives in the mouth and jaw. That is harder than it sounds — you lose your usual anchor and have to make the nasolabial fold and lip corners do the acting. The lenses are two dark shapes with one hard white highlight each; resist adding detail inside them. Note how the smoke dissolves the lower edge of the drawing so it never needs a finished border.
5. Revolver Pointed at the Viewer

This is the foreshortening exercise on the page. The arm comes straight at you, so the forearm is almost no length at all and the hand and cylinder are enormous by comparison. Block it as overlapping circles — muzzle, cylinder, fist, wrist — before you draw a single detail. Get the size jump wrong and the arm looks broken. The chain and bracelets are the depth cues that sell the distance.
6. Queen of Spades and Face Script

Almost black background, near-white face — the highest contrast image here. Work it in reverse: lay a dark ground first, then lift the face out. The card faces are the tricky part, because they are detailed line art sitting on a bright plane; keep their line weight thinner than anything on the portrait so they stay behind her in the depth order.
7. Aztec Headdress Portrait
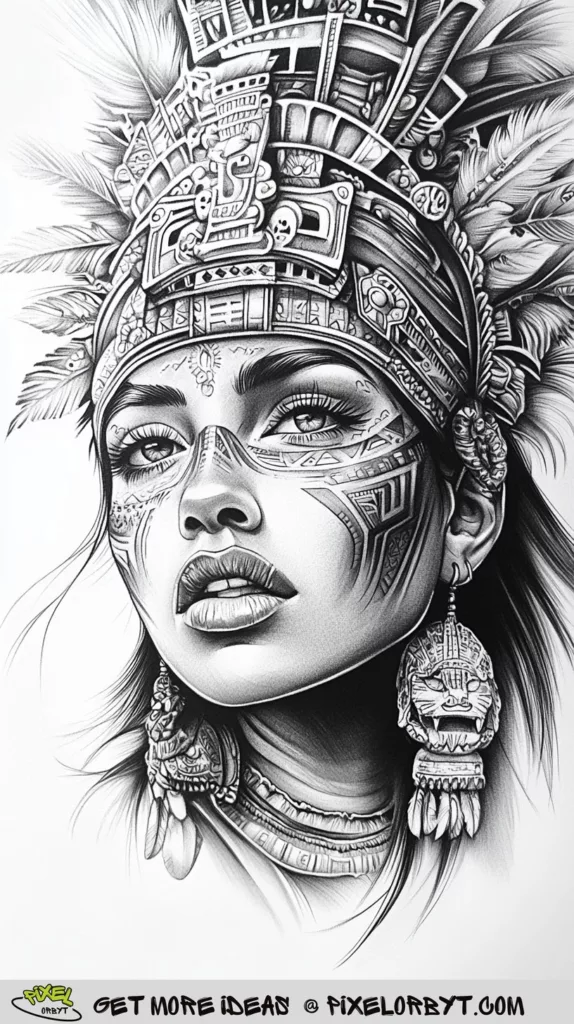
The headdress is architecture: stacked stone blocks with carved glyphs, each one a small box in perspective. Draw the head first as a simple sphere and jaw, then build the headdress around it so the blocks wrap rather than float. Feathers behind the stonework should be the lightest values on the page — if they compete with the carving, the design collapses into noise.
8. Clown Face on a Lowrider Hood

A full figure in a squat, which means the thighs are foreshortened and the shins carry the weight. The face paint is flat black shapes laid over a rendered face — paint the skin fully first, then drop the black on top, or the makeup ends up looking like a hole. The car behind him is deliberately softer and greyer; it is scenery, and pushing it back is what makes him pop.
9. Red Lips Against Black Line Work

The single spot of colour in a black-and-white piece is a classic Chicano move, and it only works if everything else stays restrained. Her lips are the loudest thing on the page because nothing else is coloured. If you try this, put the red on one small shape and one shape only — add red to the nose too and the drawing turns into a costume.
10. Skull in Shades, Smoking

Sunglasses on a skull are funnier and harder than they look, because there is no nose bridge or ears to hold them — you have to fake the perch on the zygomatic arch. Render the cranium as a smooth egg with only two or three soft value changes; every crack you add cheapens it. The smoke gets drawn by erasing, not by adding lines.
11. Sombrero Made of Rooftops

The best idea on the page: the brim is not a hat, it is a skyline seen edge-on. Build it by drawing the brim ellipse in light pencil, then growing the buildings up from that curve so they lean outward as the brim turns away. The ink splatter at the edges keeps the whole thing from looking like a technical drawing.
12. Skeleton in a Patterned Sombrero
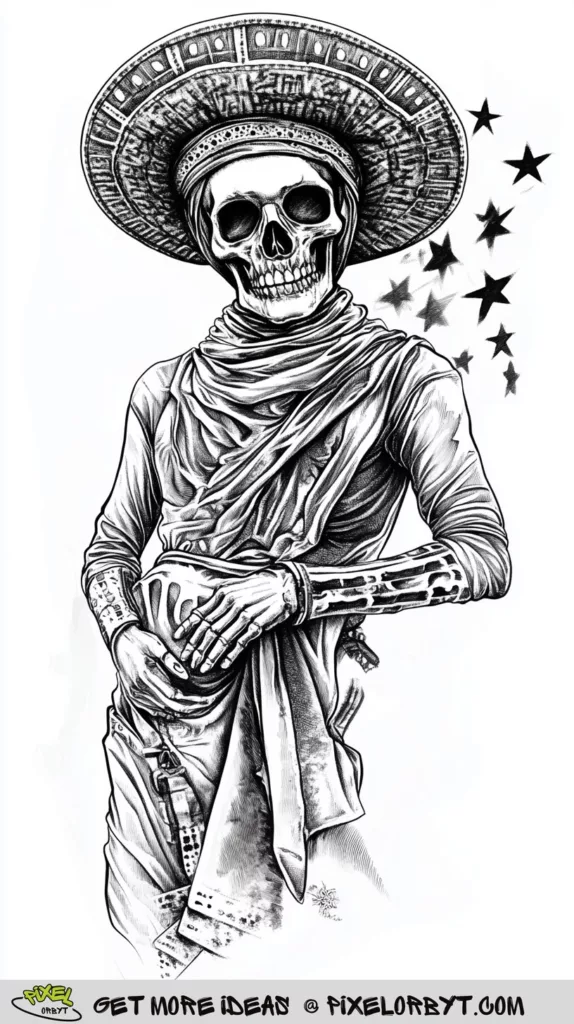
A full skeleton, which forces you to get the ribcage-to-pelvis proportion right — the gap between the bottom rib and the iliac crest is roughly the height of two vertebrae, and beginners always make it too long. The scarf is the only soft object present, so it does the job of showing where the light comes from.
13. Tattooed Woman Walking a Pit Bull

One of only two full-length figures here, and useful if you are building up your human figure sketching. The weight sits on the forward leg, so the hip on that side rides higher and the shoulder line drops the other way — that opposition is what stops a standing figure looking like a plank. The dog’s short coat needs almost no texture, just clean value blocks over the muscle.
14. Hands Over a Screaming Face

Six or seven hands, all in different rotations, laid over one face — a brutal but excellent study, and worth pairing with dedicated hand drawing references before you attempt it. Draw each hand as a flat mitten shape in the right rotation first and only split the fingers once the whole arrangement reads. The knuckle rows should form gentle arcs, never a straight line.
15. Skull Held by Many Hands

The roses growing from the eye sockets are the point of the piece, so let them be the softest, brightest thing and keep the bone flat and grey around them. Notice the hands are all lit from the same top-left source even though they come from every direction — that single consistent light is what holds a chaotic composition together.
16. See No Evil, Speak No Evil

The open mouth is the hardest element. Draw it as a dark cavity with the upper teeth catching light and the lower jaw lost in shadow — never outline every tooth. The skulls behind are drawn progressively lighter and looser as they recede, which is cheaper and more convincing than trying to blur them.
17. Blindfolded by a Dollar Bill
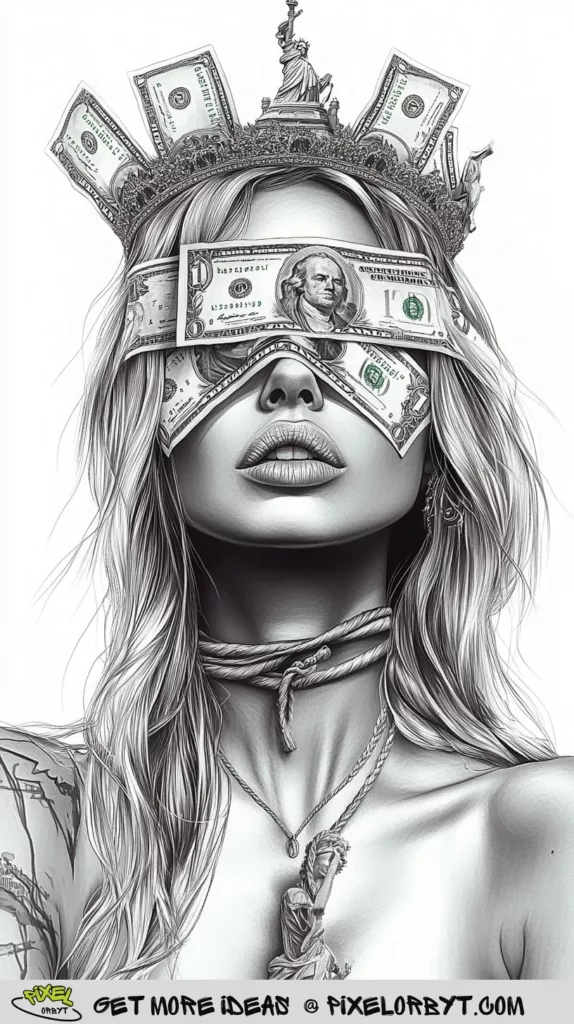
Straight political symbolism, and it works because it stays simple: one blindfold, one crown, one idea. The banknote is a flat plane bent over a round head, so the printed detail has to compress at both ends. Draw the ellipse of the head first, then map the note onto it, or the bill will look pasted on.
18. Flannel, Shades and a Grin

Plaid is a grid wrapped around a body. Draw the shirt’s folds first, then run the check pattern across them, breaking each line where the fabric turns — unbroken checks look like wallpaper. The palms and skyline are barely more than value shapes, which is exactly right for a background.
19. Top Hat, Skull Paint and a Classic Car

The top hat gives you a clean cylinder to check your perspective against — if its top ellipse does not match the eye level set by the car’s roofline, the whole scene tilts. The car’s chrome is drawn as hard black and white bands with almost no mid-grey; chrome has no local value of its own, it only reflects.
20. Driver’s Seat of a Lowrider

A one-point perspective interior with the vanishing point sitting out on the road. The steering wheel is an ellipse tilted away from you, and the dashboard is a second ellipse on a different tilt — getting those two to disagree correctly is the whole trick. Everything outside the windshield stays light so the cabin reads as the dark foreground.
21. Line-Art Face With Flowers

The lightest piece on the page and the best starting point if heavy graphite intimidates you. There is almost no shading — the form is carried entirely by line weight, thick where the form turns away and thin where it catches light. Freckles are stippled dots that get denser toward the shadow side, not scattered evenly.
22. Half Face, Half Skull

The seam is everything. Do not run it straight down the centre — break it with a jagged crack so the two halves interlock. The mouth is the hard part, because living lips and bared teeth have to line up at the same jaw angle. Draw the full skull underneath in light pencil, then lay the flesh over one side of it.
23. La Catrina and Her Lowrider

Pure Posada lineage, drawn as clean outline with no tonal rendering at all. The lace dress is the challenge: draw the silhouette and the major folds, then suggest lace with three or four small clusters of pattern rather than covering the whole gown. If you enjoy this one, the same discipline runs through these sugar skull drawing ideas.
24. Half Sugar Skull Makeup

Makeup, not bone — that is the distinction. The painted side keeps the soft roundness of a cheek underneath it, so the black eye socket has a gradient inside it rather than a flat fill. Shade the face completely first, then lay the design over the finished form and it will wrap by itself.
25. Smoking Clown Girl

The darkest, moodiest piece here. Nearly the whole background is black, which means the drawing is built from the shadows inward. Lay your darkest value first, then work back toward the light — the reverse of how most people are taught. The cigarette ember is one tiny bright dot and it anchors the entire image.
26. Mother, Baby and a Lowrider

Family imagery sits at the centre of Chicano art, and this is the version of it that appears most often. The technical problem is the baby’s head — an infant skull is proportionally huge, with the eyes below the halfway line of the face, and drawing it like a small adult is the standard mistake.
27. Frida in Fine Line and Stipple

Built entirely from dots and short hatch marks, no smudging anywhere. Stipple density does all the shading work, which means you have to plan your value map before the first dot — you cannot erase your way out of stipple. The flower crown gives you a good place to practise varying dot size for texture.
28. Profile With Tropical Flowers

A pure profile, which is unforgiving: the forehead, nose and chin sit on one continuous curve and a single wrong angle reads instantly. Measure the nose-to-chin distance against the forehead height before committing. The flowers are simple enough to serve as an easy warm-up before the heavier graphite pieces.
29. Roses, Face and a Finned Cruiser

Three subjects in one frame — portrait, florals, machine — each needing a different edge quality. Roses get soft edges, skin gets soft gradients with a few crisp accents, and the car gets hard edges throughout. That edge variety is what stops a busy composition turning to mud.
30. Lowrider in Motion

The only real action shot on the page. Motion comes from two things: a strong diagonal through the frame, and directional smoke streaks with hard leading edges that dissolve at the tail. Keep the car’s own detail slightly reduced on the trailing end — a fully rendered moving object never looks fast.
31. Skull in a Flower-Embossed Sombrero

The hat’s floral embossing is raised pattern, not printed pattern, so each motif needs its own tiny shadow along one edge. That single shadow line is the entire difference between carved and drawn-on. Underneath, the skull is kept plain on purpose so the hat can carry the detail.
32. Rose Shoulder and Face Tattoos

Clean, warm and much less loaded than most of the pieces here — a good option if you want the style without the skulls. Shoulder roses must follow the deltoid’s curve; drawn flat, they look like stickers. The face tattoos are small and low-contrast, which is what keeps them reading as ink rather than dirt.
33. Smoke and Hoop Earrings

Smoke is drawn with an eraser more than a pencil. Shade the area, then lift the plume out in curling strokes and leave the edges undefined. The hoop earrings are two ellipses seen at different angles because the head is turned — matching them exactly is a common and instantly visible error.
34. Horns, Flames and a Cigarette

Horns have to grow from the skull, not sit on the hair. Find the temporal ridge and root them there, with the hair parting around the base. The flames get treated like smoke — soft interiors, and only the outer tips given a crisp edge.
35. Filigree Sugar Skull With Roses

The filigree is symmetrical, which means every mistake doubles. Draw a light centre line down the skull, complete one side fully, then mirror it — do not try to work both sides at once. The scrollwork should get smaller and tighter as it approaches the jaw, following the narrowing of the form.
36. Torn Half-Face Portrait

A torn edge rather than a clean split, which is far more convincing and slightly easier — ragged edges forgive small errors that a straight seam would expose. The lips are rendered to a high finish while the bone stays matte, and that finish gap is what makes the living half feel alive. Worth studying alongside focused lips sketching studies.
37. Bandana Cap, Head Tilted Back

The head is tipped back, so the whole face is in a rising perspective — the nostrils show, the ears sit lower than the eyes, and the jaw line becomes the widest part of the head. Draw the cranium as a ball tilted back before you place a single feature. The line work is almost unshaded, which makes the drawing all about accuracy.
38. Decay Meets Gloss, Close Up
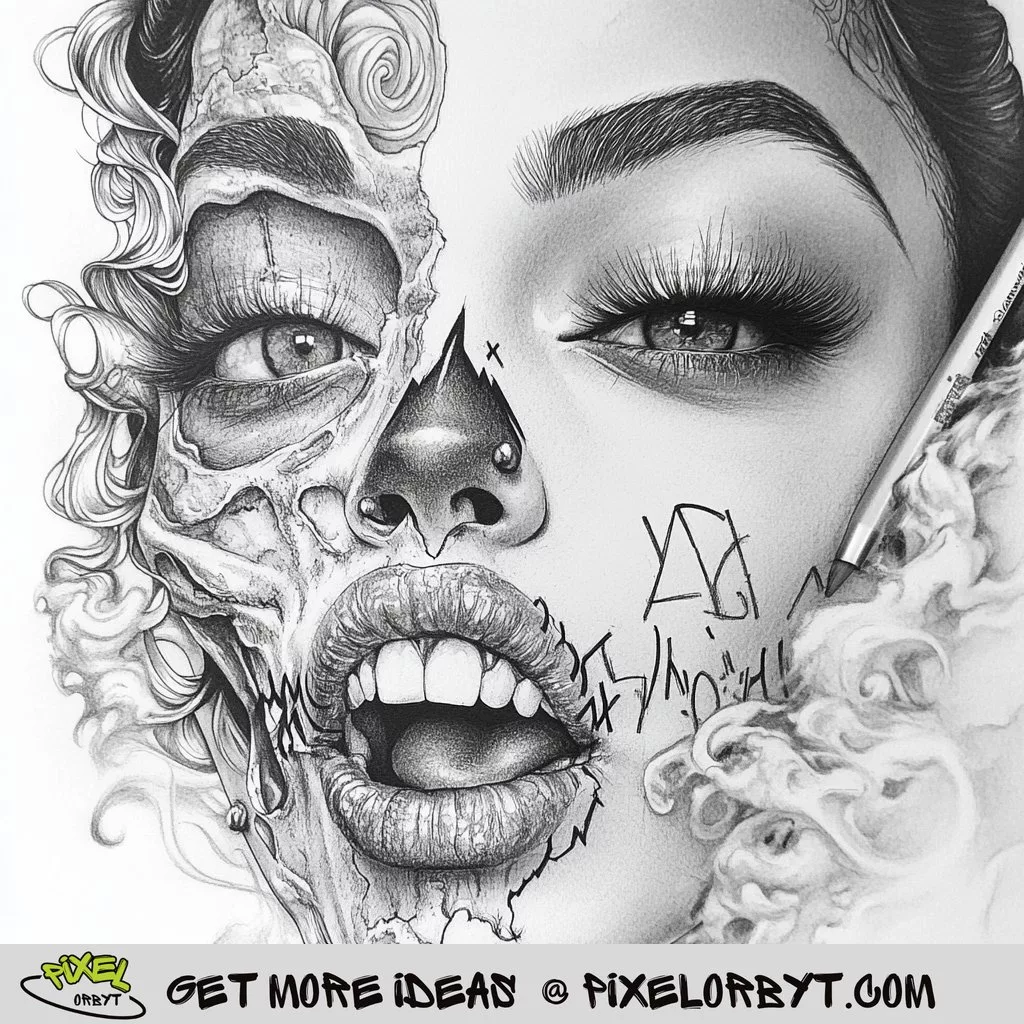
The closest crop on the page, cropping through the forehead and chin so the features fill the frame. Extreme close-ups live or die on texture contrast: the decayed side is dry, cracked and matte; the living side is wet, with hard specular highlights on the lip and the eye. Push both further than feels comfortable.
39. Jaguar With a Barrio in Its Neck

The animal head is drawn in bold pattern shapes rather than fur, and the neck dissolves into stacked hillside houses — a composition trick worth stealing. Keep the pattern flowing along the muscle direction of the skull, and let the houses shrink and lighten as they fall away so the transition reads as depth, not collage.
40. Cap, Big Frames and Chrome Lips

The oversized frames are two flat quadrilaterals in perspective sitting on a round head, and their far edge has to shorten. The lips carry a chrome-like sheen built from a hard white core highlight with a sharp dark edge right against it — that abrupt jump, not a soft blend, is what makes them look wet.
41. Full Tattoo Flash Sheet

A whole page of small designs at once, which is how tattooists actually practise. Copy the sheet as a sheet: matching line weight and value range across a dozen unrelated motifs is a skill in itself, and it exposes inconsistencies faster than any single drawing. Fill your own sheet the same way after working through these tattoo drawing ideas with pencil references.
Where the Style Comes From
The look traces back to the Chicano Movement of the 1960s and 70s, when muralists and printmakers in Los Angeles, San Diego and the Rio Grande Valley used art to argue for civil rights and land claims. The imagery pulled from three sources at once: Aztec and Mexica iconography, Catholic devotional art, and the visual language of the barrio — cars, script, neighbourhood. José Guadalupe Posada’s calaveras, printed decades earlier as political satire, became the ancestor of every catrina and grinning skull on this page.
The fine-line black-and-grey technique arrived through a different door. It developed in California prisons in the 1970s, where the only available tools were a single needle and diluted ink, and that constraint produced the smooth tonal shading and hairline detail the style is now known for. Once tattoo artists like Freddy Negrete and Jack Rudy brought it into street shops, it spread worldwide.
What Makes These Drawings Work
- Value, not line. Most of the pieces here are built from smooth graphite gradients with very few contour lines. Blending stumps and a kneaded eraser do more work than the pencil point.
- Extreme tonal range. True black next to untouched paper white, in the same drawing. Half-hearted greys are the single most common reason a Chicano-style piece falls flat.
- Symbols that carry weight. A skull is mortality, a rose is love and loss, praying hands are faith, a lowrider is neighbourhood pride. Nothing is decorative for its own sake.
- Fine detail against empty space. Dense filigree or lettering placed beside a completely blank area — the emptiness is what makes the detail read.
- Old and new together. Aztec headdresses share the frame with snapbacks and sports cars, and the collision is deliberate.
How to Draw Chicano Portraits Better
Work on smooth paper. Bristol or hot-press takes the graduated shading this style needs; textured cartridge paper fights you and leaves a speckle you cannot smooth out. Use a narrow pencil range — 2H for the light passes, HB for the bulk, 4B and 6B only for the deepest accents — and let the blending stump build the mid-tones rather than pressing harder.
Block in the whole head before any tattoo, script or makeup goes on. Every design element on these faces is wrapping a form that already exists underneath, and drawings that skip the underlying structure look like flat stickers no matter how well the ornament is rendered. The same principle governs any realistic sketching ideas: form first, surface second.
Copy one drawing a day rather than starting five. The tattoo sketching workflow that professionals use — thumbnail, tight pencil line, then rendering — is worth adopting whole, and it is faster than it looks once the habit sets. Watch your reference for what has been left out; the confidence in these pieces comes as much from the blank areas as the rendered ones.
If the female portraits are what drew you in, spend time on general female character sketch ideas too. The lashes, lips and hair in this style are stylised heavily, and knowing what the realistic version looks like is what lets you exaggerate on purpose instead of by accident.
FAQ
Do I need to be Mexican-American to draw in this style?
No, but understand what you are drawing. The symbols are specific — a catrina is tied to Día de los Muertos, praying hands and Guadalupe imagery are devotional, certain lettering styles carry neighbourhood meaning. Learning what they mean before using them is the difference between studying a tradition and lifting from it. Credit the artists you learn from.
What pencils should I use for black-and-grey work?
2H, HB, 4B and 6B will cover everything on this page. Blending stumps in two or three sizes matter more than extra pencil grades, and a kneaded eraser sharpened to a point is your main highlight tool — most of the smoke and shine in these drawings was lifted out, not left blank.
Why do my tattoo details look pasted on?
Because the form underneath was not finished first. Shade the arm, chest or face to completion, then draw the tattoo over the finished shading and let it dim in the shadow areas and brighten in the light. A tattoo that keeps the same darkness across a curved limb will always read as a sticker.
Which of these should a beginner start with?
Number 20, the line-art face with flowers, or number 27, the tropical-flower profile. Both are carried by line weight rather than tonal rendering, so you can finish one in an evening and see clearly where your proportions went wrong. Leave the multi-hand compositions at 13 and 14 until you have drawn a lot of hands.
How long does one of these take?
A clean line piece is an hour or two. A fully rendered graphite portrait like number 6 or number 24 is realistically six to ten hours spread over several sittings, and most of that is spent blending and re-blending the mid-tones. Rushing the grey is what separates an amateur attempt from a finished one.
Pick one, set a timer, and copy it as closely as you can. The style rewards patience more than talent — every artist working in it got there by putting in hundreds of hours of grey.


