
22 Beautiful Mini Canvas Painting Ideas
A mini canvas is usually somewhere between two and five inches across, and that size changes what you can paint on it. There is no room for a complicated scene, so the paintings that work are the ones built around a single subject, a limited palette and a surface you can cover in one sitting.
Every idea below is one of those, taken from a painting on this page, and each names the part that is actually tricky — the highlight that makes the cherries look wet, the shadow that stops the cactus floating.
Hung in a row at even spacing, small canvases like these also work as grown-up wall art — the same logic behind several of these living room wall art ideas, where a group only reads as one piece if the gaps stay consistent.
22 Mini Canvas Painting Ideas
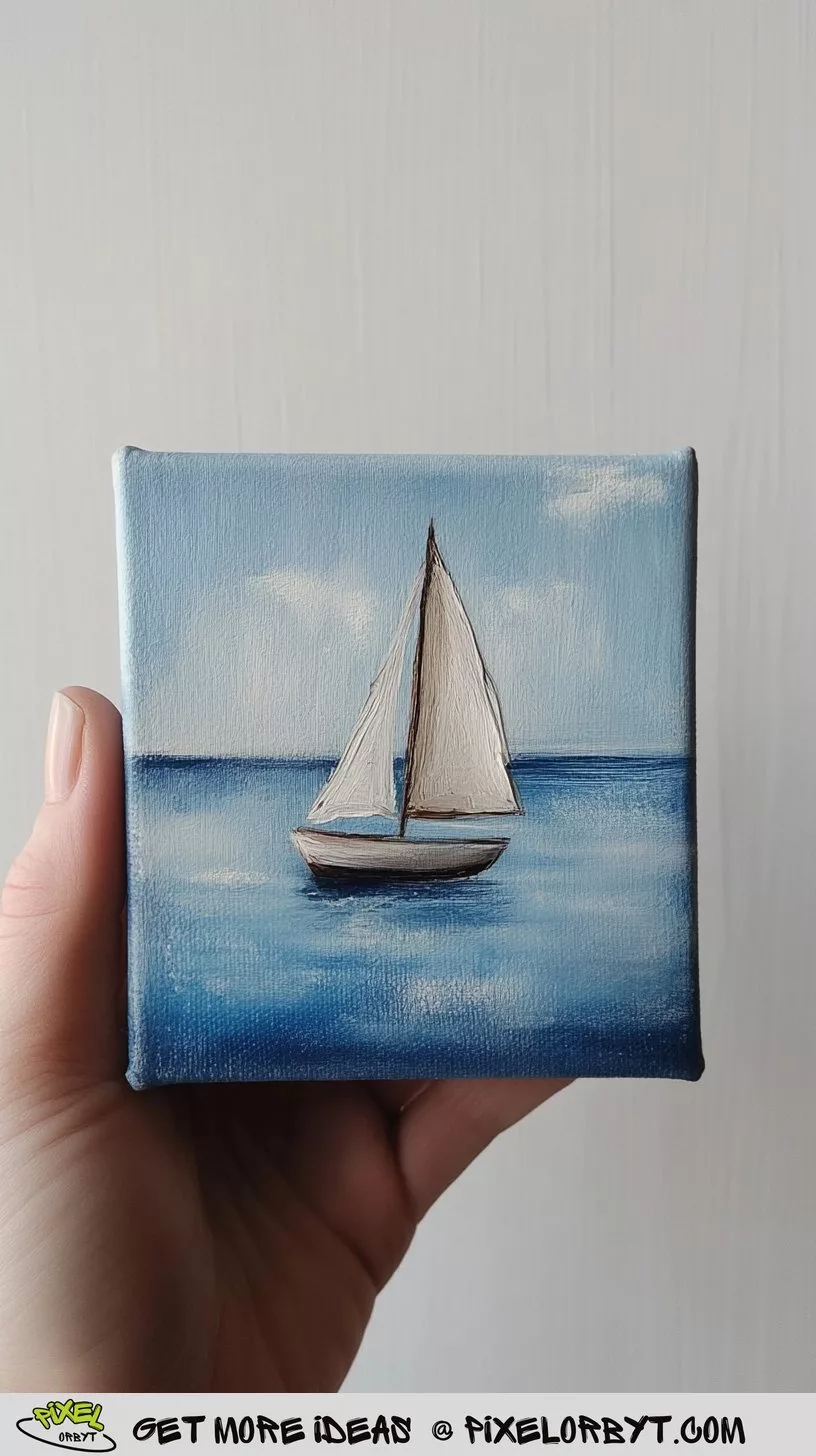
1. A Sailboat on Flat Water

The whole painting is three bands — pale sky, blue water, a deeper blue across the bottom — and one small white shape. Paint the water wet-on-wet so the horizon stays blurred, then let it dry completely before the sails go on.
Those sails are the only hard edge on the canvas, and they have to stay white. If the brush picks up any blue from underneath, the boat sinks into the water instead of sitting on it. One loaded stroke per sail, then stop.
2. A Cottage With a Red Roof

Thick paint, almost no blending: the roof is laid on in short overlapping strokes that still show the bristle marks, and the foliage is dabbed around the house with the corner of a flat brush. The path is a single pale stroke of sienna and white.
The difficulty is keeping the roof clean. Block the house in first, let it set, and only then crowd the greens around it — the other order drags green into your red every time. These landscape painting ideas use the same sequence at larger sizes.
3. Two Cherries

Two highlights do all the work here. There is a hard white dot where the light hits the top of each cherry, and a much duller glow along the bottom edge where light bounces back off the surface. Miss the second one and the fruit looks like a flat red circle.
Build it in order: flat dark red shapes, a crimson shadow side, then the highlight last with a liner tip. The joined stems should read as one continuous curve, not two straight lines meeting at a point.
4. A Lantern With a Real Glow

Glow is a value problem, not a colour problem. The pale blue immediately around the lantern has to be darker than the flame inside it, or the light simply will not switch on no matter how bright a yellow you use.
Paint the blue field first, scrub a pale yellow halo into it while wet, then drop the black frame on once it dries. Keep the metalwork thin — heavy bars smother the light you just built.
5. A Pastel Rainbow

Four soft arcs in pink, peach, butter yellow and sky blue over bare white. It is the simplest painting on this list and the best test of a steady hand you will find on a four-inch surface.
Pull each arc in one unbroken motion with a round brush; stopping halfway to reload leaves a visible lump in the curve. Let each band dry before laying the next against it or the pastels grey out at the seams.
6. A Graphic Butterfly

Flat colour panels in blue, orange and yellow, fenced in by crisp dark outlines. Freehand symmetry at this scale is punishing, so fold a scrap of paper in half, cut one wing, open it out and trace both sides.
Fill the colour blocks first and outline last with a fine liner. Outlining first feels tidier and guarantees you paint over half of it. These butterfly sketching ideas are worth a pencil run first.
7. A Folk-Art Butterfly

Same subject, opposite approach. Red, teal and olive dabs sit straight on a cream ground with no outline anywhere, and every stripe is one visible brushstroke that nobody went back to fix.
Load more paint than feels sensible and commit to the mark. Painting this one straight after the graphic butterfly above teaches you more about your own style in an afternoon than a month of reading.
8. A Single Carrot

The horizontal ridges are not painted on — they are scratched out. Drag the tip of a palette knife through the wet orange and the pale canvas underneath shows through as a thin light line. It takes seconds and does what a tiny brush cannot.
Keep the tops loose and spiky, cooled with a touch of blue so the green stops fighting the orange. The shadow under the root end is what keeps it from floating.
9. A Bumblebee

Seen from above, furry black and yellow body, wings you can see through. The fur is dry brush work: almost no paint on the bristles, the brush held nearly flat, flicked outward from the body so the strokes break up at the edges.
Wings go on after the body is bone dry, thinned with medium so the stripes show faintly through. Legs and antennae last — paint them early and the fur swallows them.
10. A Cactus in a Terracotta Pot

What makes this little plant sit on a surface instead of hovering is the shadow: a soft grey ellipse to one side, darkest right where the pot meets it and fading as it moves away.
The ribs are alternating light and dark green vertical strokes, nothing more. Spines go on dead last in white, flicked outward with the brush tip barely touching.
11. A Bold Red Heart

No brush involved. Scoop cadmium red onto the flat of a palette knife and lay the heart down in two strokes that meet at the point. The ridges left behind catch the light and give the whole thing its handmade look.
Five minutes, one colour, and it is reliably the mini canvas people ask to take home. Resist smoothing it afterwards — the texture is the painting.
12. A Cherry Blossom Branch

A dark branch cutting across a soft pink wash, with blossoms clustered along it. Wash the background first and let it dry properly, because a wet pink ground will grey out every petal you put on it.
The branch has to taper: press down at the base and lift gradually toward the tips. Blossoms are fingertip dabs in uneven clumps — space them evenly and the branch stops looking alive.
13. A Red Toadstool

Red cap, white spots, pale stem, one small tuft of grass at the base. The spots are the tell: they follow the curve of the cap, round and large across the middle, squashed into narrow ovals as they approach the edges.
Paint them as even circles and the cap flattens instantly. The gills are fine warm-grey lines radiating from the stem. These mushroom sketching ideas cover the cap-and-gill shapes in pencil.
14. A Goldfish

The fins are the painting, not the fish. Pull each stroke outward from the body and let the bristles split as they go, so the fin feathers away at the end instead of stopping on a hard edge.
Scales belong on the belly only, a short row of small crescents — cover the whole body and it reads as chainmail. One black eye with an off-centre white dot finishes it.
15. An Ice Cream Cone

Thick pink soft-serve against a pale blue sky. Load a small flat brush and rotate it as you come down the swirl — wide at the base, tighter with each turn — so the paint stands up off the canvas.
The waffle texture is scored into wet paint with the knife edge, two sets of crossing diagonals. Keep sprinkles to three or four specks; a shower of them reads as dirt.
16. A Textured Sun

The sun and the field behind it are almost the same yellow, which sounds like a mistake and is the entire trick. What separates them is the thickness of the paint, so the disc catches raking light and the background does not.
Build the centre up heavily, keep the surrounding yellow thin, warm the rays with a little orange. Thick-paint tricks carry straight over to slower media — see this guide to oil painting for beginners.
17. A Snow-Capped Peak

Distance here is a value ladder. The forested base is nearly black, the mid slopes sit in mid-blue, and the summit is almost white. Flatten those three steps into one tone and the mountain loses all its depth.
Keep the snow line jagged and lopsided; a neat symmetrical triangle reads as a party hat. Clouds go in soft behind the summit with a dry brush, so the rock edge stays the sharpest thing on the canvas.
18. A Sunburst

White rays pulled outward over a golden ground — light paint over dark, each ray a single stroke from the centre out. The variation is what sells it: different lengths, slightly different angles, a few pairs almost touching.
Rays of identical length and spacing look like clip art. It hangs well as a set of three with the textured sun and the sunset blend below.
19. A Single Leaf

The quietest painting on the list and the hardest. Lay the central vein in first, then branch the side veins off it at a consistent angle, each one curving gently toward the tip rather than running straight out.
Vary the greens or it turns plastic: yellow-green where the light lands, blue-green in the shadowed half, a little brown at the stem. Leave the outer edge slightly ragged — smooth edges read as printed.
20. A Rainbow Spiral

Lay concentric rings of colour while everything is still wet, then drag a clean brush from the centre outward in one spiralling motion. The paint smears itself into the vortex — you are steering it, not drawing it.
Thin dark bands between the colours stop them muddying as they pull. Timing is everything: too dry and the brush skips instead of dragging, so mix everything before you start.
21. A Crescent Moon and Stars

Mix the navy in two values, lighter around the moon and deeper toward the corners, so the sky itself seems to glow near the crescent. A single flat navy kills that effect completely.
The crescent is easiest as two overlapping circles: paint a full cream disc, dry it, then cut the shape back with background navy. Stars in three sizes, scattered unevenly, a few gold among the white.
22. A Sunset Blend

No subject at all — pink at the top, purple at the bottom, and one seamless transition in between. It is a blending drill disguised as a finished piece, and it belongs on a shelf all the same.
Work a clean, almost dry brush across the seam before either colour sets — acrylic gives you about a minute. The same gradient is far more forgiving in these watercolor painting ideas for beginners.
Getting More Out of a Small Canvas
Small surfaces punish the wrong tools. A brush that cannot turn inside four inches fights you on every one of these, and watery paint floods the surface before you have placed anything.
- Three brushes is enough: a quarter-inch flat, a size 2 round, and a liner for spots, stars and spines.
- Use heavy body acrylic. It holds a ridge at this scale — that is what gives the heart, the sun and the ice cream their texture.
- Paint the background first, always. Cutting a sky in around a finished branch on a canvas this small is miserable work.
- Mix more than you need. Running out of a custom green halfway through is the usual reason a small painting goes wrong.
- Work in sets of three. Related minis hung together carry a wall that a single one cannot.
When a small study starts feeling tight, the same subjects open up on a bigger surface — these 36 canvas painting ideas and this wider set of canvas painting ideas for every skill level show how each composition changes with room to breathe.
Frequently Asked Questions
What size canvas counts as a mini canvas?
Roughly two by two inches up to about five by seven. Most paintings on this page are four-inch squares or four by six rectangles — big enough for a recognisable subject, small enough to finish in an evening.
What kind of paint works best?
Heavy body acrylic. It dries fast, stays where you put it, and holds the knife ridges that give these paintings their character. Fluid acrylic and watered-down craft paint spread too far at this size. Oils suit the blended pieces like the sunset gradient, but expect days between layers.
How long does a mini canvas painting take?
The palette knife heart takes five minutes. The rainbow, sunburst and gradient are half an hour each. The mountain, goldfish and leaf hold you an hour or two because of the layering. These canvas painting ideas for beginners are built around the same one-session scale.
Do I need to prime a shop-bought mini canvas?
Not strictly — they arrive pre-gessoed. One extra thin coat, sanded lightly once dry, gives a smoother surface for detail work like the leaf veins or the cherry highlights. For textured pieces, skip it and paint onto the weave.
Start With the Easy Ones
Pick one of the five-minute paintings first — the heart, the rainbow, the gradient — and finish it properly rather than abandoning something ambitious half-covered. One finished mini canvas on the shelf does more for your painting than three unfinished ones in a drawer.
Once a few are drying on the windowsill, the same one-subject approach carries to other surfaces. These pottery painting ideas cover mugs and small pots that take about as long and need the same brushes.


