25 Realistic Deer Pencil Drawing Ideas for Every Skill Level
A deer is mostly two hard problems stacked on top of each other: a skull that is almost all planes and no padding, and a coat that changes direction every few millimetres. Get the planes wrong and no amount of fur rendering will save the drawing. The 25 references below are sorted roughly from soft fawn studies to heavy antlered bucks, and each one names the specific thing it will teach you.
None of these are step-by-step tutorials. They are reference studies — the useful move is to pick one, work out what decision the artist made that you would not have made, and copy that decision rather than the whole drawing.
Work through them with a small pencil range — HB for construction, 2B–4B for the body of the shading, 6B or 8B for the nose and eye — plus a kneaded eraser you can shape to a point. If you want the same subject in a looser format first, the realistic animal sketching of deer post covers gesture-led versions of these poses.
25 Realistic Deer Pencil Drawing Ideas
1. Full Antler Rack on an Open Sketchpad

Start here if you want to see the finished target. The rack has eight visible points and every tine tapers as it rises — that taper is what stops antlers reading as bare branches. Note how the artist left the paper almost untouched around the muzzle and drove the darkest graphite into the nose and the shadow under the chin, so the head reads as three-dimensional with very little mid-tone anywhere else.
2. Two Fawns Standing in Wildflowers
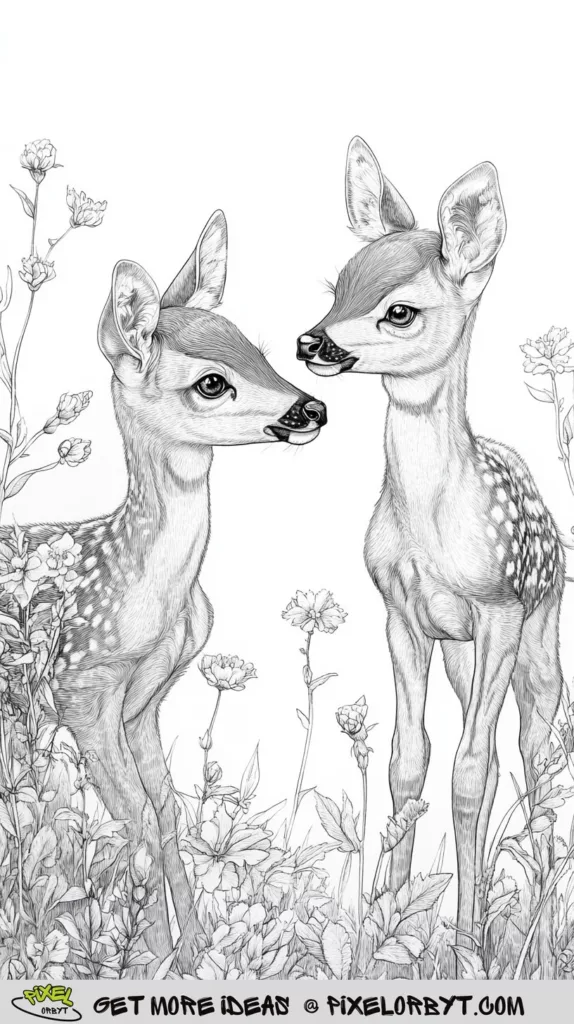
Two animals in one frame forces you to solve overlap. The front fawn faces you, the rear one turns three-quarters away, and their necks cross at exactly the point where you must decide which contour wins. Keep the background flowers a full tone lighter than the fawns’ legs or the whole lower half of the drawing collapses into grey mush.
3. Three Fawns Among Foliage

The two standing fawns meet nose to nose while a third lies below them, and the leaf work behind is drawn in clean outline rather than shaded mass. That contrast is deliberate: outlined foliage stays back, shaded fur comes forward. Copy that decision rather than rendering every leaf, or the plants will fight the animals for attention.
4. Doe Head-On With Flared Ears

A symmetrical front view is unforgiving — one ear set a few millimetres higher than the other and the head looks broken. Draw a light centre line down the skull before anything else. The chest fur here simply dissolves into white paper instead of ending at a hard edge, which is the cheapest way to make a portrait feel like it is emerging rather than pasted on.
5. Standing Spotted Fawn, Full Body

The most useful proportion study in the set. Measure it: the legs take up more than half the total height, and the body is barely deeper than the neck is long. Beginners almost always draw the barrel too big and the legs too short. The spots follow the curve of the ribcage — they compress toward the flank edge, which is what tells the eye the body is round.
Watch the hooves too. All four sit on slightly different levels because the ground is not flat, and that small stagger is what stops a standing animal looking like it has been pasted onto the grass.
6. Deer in a Scarf, Stylised

Realism and invention in one drawing. The head is anatomically sound, then the antlers stretch past anything a real deer grows and a scarf wraps the neck. The scarf is the technical exercise here — fabric folds need a different logic from fur, and the fabric texture drawing guide breaks down how to shade drapery so it reads as cloth rather than tubes.
7. Sitting Fawn With Curled Legs

The eyes are enlarged and the muzzle shortened, pushing this toward illustration rather than realism. It is still worth drawing: simplified forms make the underlying construction visible, so you can see the sphere-on-wedge structure of the skull that the detailed portraits hide. More work in this register lives in the easy cute animal drawing collection.
8. Fawn Lying With Front Legs Folded

Folded legs are a foreshortening test. The forelegs come toward the viewer and shorten dramatically, so you have to draw the knee joint as an ellipse rather than a straight bend. Resist the urge to lengthen them back to a comfortable shape — the awkwardness is correct.
9. Fawn Bedded Down in Tall Grass

The darkest drawing in the set and the best lesson in edge control. Grass blades cross in front of the fawn’s chest, which means some of the animal’s outline is interrupted — exactly what makes it look bedded down in cover instead of floating above it. Draw a few blades over the body, not all of them around it.
10. Young Buck With First Antlers

A buck in its second year: the antlers are short forks rather than a full rack, and the neck has not thickened yet. A faint warm tone across the forehead lifts it out of pure greyscale. If you are working in graphite only, translate that tint into a slightly lighter value rather than trying to imply colour.
11. Fawn Face Close-Up on Blank Paper

Nothing but the head, floating on untouched paper. With no background to lean on, the drawing lives or dies on the value jump between the black nose, the mid-grey fur and the white page. Squint at it: you should still be able to read three distinct tones. If everything blurs to one grey, your darks are not dark enough.
12. Doe Head in Three-Quarter View

The three-quarter turn is the most flattering angle for a deer and the hardest to place. The far eye sits closer to the head’s outer contour than feels natural, and the muzzle overlaps the far cheek. Get those two relationships right and the rest is texture work.
13. Doe and Fawn in a Mountain Meadow

The only full environment in the set. The mountains are held at a light, even grey with no sharp edges anywhere, while the two deer carry all the contrast — that value gap is the entire illusion of distance. For more on staging animals inside a landscape, the scenery sketching ideas post covers the same depth problem without an animal in the way.
14. Minimalist Line Buck

Almost no shading at all — the body is described by contour alone, with a few grass strokes anchoring the hooves. Draw this one on a timer, ten minutes maximum. It trains you to commit to a proportion decision instead of hiding a weak drawing under rendering, which is the single most common habit holding beginners back.
It is also a useful diagnostic. If the ten-minute outline already looks like a deer, your proportions are sound and your rendering is what needs work. If it does not, no amount of shading practice will fix the underlying problem.
15. Montage of Overlapping Deer Heads

Eight heads at eight angles, layered so antlers cross and heads tuck behind one another. Treat it as an angle library rather than a single artwork: pick two heads, draw them at the same scale, and study how the eye, ear and muzzle shift as the skull rotates. The fully rendered heads sit in front, the ghosted ones behind — depth by finish level, not by size.
16. Doe Face Filling the Frame

Cropped so tight the ears run off the paper. That crop is a compositional choice worth stealing — it makes the viewer feel close to the animal rather than observing it. The dark, wet-looking nose and the pinpoint white highlight in each eye are doing most of the work; everything else is soft mid-grey.
17. Mature Buck With a Multi-Point Rack

A full mature rack, drawn from three-quarters so the two antlers do not mirror each other. Build antlers as cylinders first, then add the pearling — the rough beaded texture near the base — with short irregular flicks. Smooth antlers always look plastic. The dark neck against the pale page keeps the rack readable.
18. Buck With Foliage Behind the Antlers

Fine leaf sprigs sit behind the rack at a much lighter pressure, filling the empty space between the tines without competing with them. It is a neat solution to the problem every antler drawing has: too much blank paper inside the rack. Keep the foliage under a 2B and it stays supporting cast.
19. Signed Doe Portrait With Glossy Eyes

Look at the chest fur — every stroke follows the direction the hair actually grows, fanning outward and downward from the throat. Fur is not texture applied on top of a shape; it is the shape. Drawing strokes in a uniform direction is what makes amateur animal work look like it is wearing a wig.
20. Work-in-Progress Doe With Pencil Alongside

Caught mid-render, with the pencil still on the page. The head is largely finished while the lower neck is barely started — the artist worked outward from the eye and nose rather than covering the whole drawing evenly. That order matters: establish your darkest dark early so you have something to judge every other value against. More on that sequence in these pencil drawing tutorials for beginners.
21. Full-Body Buck in a Woodland Clearing

The whole animal, standing square with the head turned toward you. The chest sits noticeably higher than the rump on a mature buck — that forward-heavy line is a big part of why a buck reads as powerful and a doe does not. Background trees are suggested with vertical strokes only, no branch detail.
Full-body work also exposes leg construction, which portraits let you avoid entirely. A deer’s hind leg bends the opposite way to a human knee — what looks like a backwards knee is actually the heel, sitting high up the leg. Draw that joint wrong and the animal reads as broken no matter how good the head is.
22. Doe Turned Left With a Single Antler Bud

A near-profile turn with one small antler bud showing. Profile views expose the muzzle’s true length, which most artists shorten by habit. Measure it against the eye: the distance from eye to nose tip is longer than you think, usually about the width of the ear. The nose here is stippled rather than smoothly shaded, which is what gives it that damp, granular look.
23. Pale-Chested Buck With Tall Antlers

Compare this rack to the heavy one a few images up. These beams are slimmer and rise more vertically, giving the animal a lighter, younger silhouette. The chest is left almost white, which pushes all the contrast up into the face — a good trick when you want the viewer to land on the eyes immediately.
24. Heavy Buck With a Thick Neck Ruff

A rutting-season buck: thickened neck, dense shaggy ruff, brow tines curving forward over the face. Those brow tines are the detail most people leave out, and they are what makes a rack look like a real animal’s rather than a symmetrical prop. Build the ruff with long overlapping strokes of varying pressure, never a flat tone.
25. Buck With Pines and Two Pencils

Closing the set with a three-quarter buck against faintly indicated pines. The trees are little more than suggestion, kept several values lighter than the fur, which is the same distance trick used in the meadow scene earlier. If you want the same subject stripped back to clean outlines for practice, the deer coloring pages are drawn from the same anatomy.
What Actually Makes a Deer Drawing Look Real
Across all 25 references the same four decisions keep coming back. They are worth practising on their own, away from a finished piece.
- Build the skull as planes, not an outline. A deer’s head is a long wedge with a distinct flat forehead, a break at the brow, and a narrowing muzzle. Block those three planes in first with an HB. If the planes are right, sloppy fur still reads as a deer.
- Let fur direction do the shading. Hair grows outward from the nose, down the neck, and back along the flank. Stroke along that flow and your shading and your texture become the same operation instead of two competing layers.
- Reserve your whites. The highlight in the eye, the rim on the ear edge, the pale chest — plan these before you lay down graphite. Lifting a highlight out with a kneaded eraser afterwards never looks as crisp as paper you never touched.
- Push the nose darker than feels comfortable. In nearly every reference above, the nose is the single darkest value on the page, usually a 6B or 8B worked in stipples. It anchors every other tone in the drawing.
Antlers deserve their own practice session. Draw the beam as a tapering cylinder, mark where each tine leaves it, and only then add surface texture. Beginners usually draw antlers as flat forked lines, which is why they end up looking like bare twigs stuck to a head. If you want to apply the same value discipline to other species, the realistic animal pencil drawing and sketching set runs through fur, feathers and hide side by side.
Deer also sit naturally inside a wider outdoor sketching habit — grass, bark, mist and undergrowth all show up in these compositions, and the nature sketch ideas post is a good place to build those supporting textures before you drop an animal into them.
Deer Pencil Drawing FAQ
Which pencils do I need for a realistic deer?
Four will cover everything above: HB for construction lines, 2B for the bulk of the fur, 4B for shadow masses under the chin and along the flank, and 6B or 8B for the nose and pupils. A kneaded eraser shaped to a point handles the whisker highlights. Paper matters more than pencil count — use something with a light tooth, around 200 gsm, so it takes four or five layers without going shiny.
Why do my deer drawings look flat even when the shading is smooth?
Almost always a missing value range. Smooth shading in a narrow band of greys reads as flat no matter how carefully it is blended. Photograph your drawing and desaturate it: if the darkest point is not close to black and the brightest is not untouched paper, add contrast at both ends before adding any more detail.
Should I draw a fawn or a buck first?
A fawn portrait, like the close-up head studies in this set. No antlers means one fewer construction problem, and the softer coat is forgiving of imperfect strokes. Once you can place a fawn’s eyes and muzzle reliably, add the rack — antlers are a separate skill and layering both at once is how people end up frustrated.
How do I draw fur without spending six hours on it?
Do not draw individual hairs across the whole animal. Lay a mid-tone base with the side of a 2B, then break it up with directional strokes only where the eye will land — the face, the ear edges, the chest ruff. Everywhere else, a soft gradient reads as fur perfectly well at normal viewing distance.
Can I trace these references while learning?
Trace once to feel the proportions, then close the reference and redraw from observation. Tracing alone builds no measuring skill. The value comes from the second attempt, when you find out which relationships you actually absorbed.
Pick three from this page rather than working straight down the list — one fawn portrait, one full-body pose, one antlered buck. That spread covers proportion, foreshortening and texture in a single sitting, and it will tell you quickly which of the three you need to spend the next month on.